top of page
Search
Writer's pictureMegan

The backyard playhouse is finished!

When we initially drew out the plans for this playhouse, I had no real idea how many trips to Home Depot would be made. But now that it is finished, it was totally worth it!

All of the construction supplies and plant life were purchased at Home Depot.

Paint Colors:

Metal Roof: Rockweed SW2735

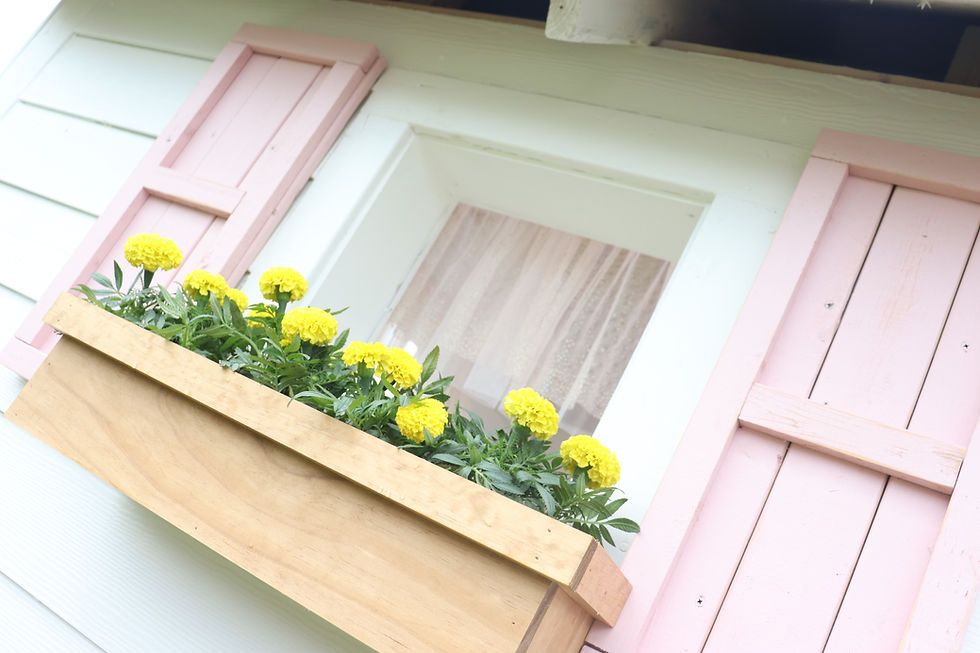
Pink Shutters: Rose Colored 6303

Base Color: BM Simply White

Stain Color: Varathane Early American

For the window treatments, I had some left over fabric from a Hobby Lobby project to make the girls some ballerina skirts. I had the perfect amount left and used my staple gun to secure the fabric to the tops of the windows. There was a cotton fabric as a third layer that I cut off so the windows could be breezy and not really visually obstructed.

Location of the items inside of the Playhouse...

Pink chairs: Walmart

Rug: Amazon

Gold Butterflies: Hobby Lobby

Chandelier: DIY

-wooden beads from Amazon

- fabric chord from Hobby Lobby

- circular metal wreath bases from Hobby Lobby

Table: TJ Maxx

Golden Bells: TJ Maxx

Vase: Kroger

Porch Lights: Target

And the slide is also from Amazon

The neighborhood kiddos love the play house, there have already been many crafts and pretend parties up there. We hope to do a family movie night out there once we get a projector. Many fun memories to come for sure!


202 views0 comments
Writer's pictureMegan


We love to visit Amelia Island. It has become a very special place to our family. So far we have stayed in two different VRBO condos and the Seaside Amelia Inn (which we also loved). This time we decided to try the OMNI Amelia Island Resort. We scheduled our visit almost a year in advance and found a great deal on one of the travel websites. Thankfully our trip was scheduled for a few weeks after the Covid-19 limitations were lifted. This did affect a few things about our visit, but it also had some positive impacts.

Negative Impacts:

  • No room service

  • During our visit the Spa was closed, but is now open as of June 4th.

  • Other amenities such as the putt-putt course, bike rentals, and a few other things were only open certain days/hours. This is ever changing and questions are quickly and kindly answered by the staff when you call (904) 261- 6161.

Positive Impacts:

  • No large crowds. There was plenty of room at the pool/beach. This will most likely change as states slowly open back up and more people head to the beach.

  • No rental fees, we were able to use the cabanas, chairs, and beach tents as first come first serve.

  • Extreme cleanliness and consideration from staff.

Our Room

Our room was a premier ocean view room with 2 queen beds. We were able to use our AAA membership to get a discounted room rate. This room worked really well for our family of four. The bathroom had a nice roomy shower/bath and was super clean with new towels/toiletries replaced each day. The beds were very comfortable and the balcony was a great place to sit and listen to the ocean. They even had a screen door you could close and let the sound of the ocean fill the room.


Pool / Beach


Our daily routine involved heading straight to grab a spot at the pool. They had fresh towels out each day for use at the pool and down at the beach.

(big comfy extra large towels)

There are three pools, one for adults 18 and older, another large pool for anyone to use, and a splash pad area for little ones. The great thing about the kids pool was the tiered entrance where kids could play on the different levels.

There is a walkway out to the beach with a hose to rinse off with. This was wonderful in helping us clean all the sand off of our things so it didn't get back up to the room with us. We also love the beaches on Amelia Island, they are great for finding shells and have plenty of soft sand to play in. Our friends that usually join us on these trips are experts at finding lots of shark teeth on the beach.

These cabanas are available on the beach and by the poolsides.

The poolside food was not super cheap, but totally delicious and worth it. You definitely get what you pay for. I highly recommend the burger.

Our favorite spots in Amelia Island

Fantastic Fudge

One of our go to spots every time we are in Amelia Island is Fernandina's fantastic fudge. They have incredible ice cream and other goodies. Our go to ice cream order is the salted caramel with chunks of their freshly made chocolate fudge. There are a lot of really neat shops and a really sweet bookstore nearby!

Shuckers

We love to go to dinner at Shuckers. They have great food and a wonderful atmosphere. We love to sit outside on the covered patio, the kids play on the play ground, and the surrounding land is especially gorgeous at sunset. Check their facebook page because certain Monday's are all you can eat crab legs.


We had such a fun time in Amelia Island, it never disappoints! If you're looking for a family friendly beach vacation, Amelia Island is a wonderful spot! And the Omni Amelia Island Resort was a fantastic place to stay, I highly recommend.


73 views0 comments
Writer's pictureMegan

Here's how I made this DIY wooden wall art to decorate a basement with a pool table!

I was recently commissioned to help a friend decorate their basement. They wanted it to be cozy and include the things their family loves. This also needed to include the pool table they would be putting down in the basement. I was on the hunt for wall art that wasn't super expensive and gave the room a cohesive feel. There is not a lot out on the market in the world of "pool table art". So I started brain storming artwork that I could DIY for the wall. I wanted to create a piece of art that looked like the triangular rack getting the pool balls in their starting position.

I wandered the aisles of Hobby Lobby looking for things that could bring my idea to life. I wanted to make an oversized version of what the real thing would look like.

These are the supplies I needed to create the pool balls.


Pool Ball Supplies

The names of the paint colors I used were:

- 11039 Wine (Anita's Acrylic)

- 1114101 Tomato Red (Anita's Acrylic)

- 11140 Pumpkin (Anita's Acrylic)

- 11053 Buttercup (Anita's Acrylic)

* This one was not exactly the mustardy yellow that I wanted. I ended up mixing in a little orange, but if you can find a more mustard color I would go with that.

- 11182 Christmas Green (Anita's Acrylic)

- True Blue (DecoArt)

- 11148 Purple Pansy (Anita's Acrylic)


You will also need:

- Paint brushes

- Good painters tape or

- A pencil & ruler.

(I started with the tape, but it was bleeding through and not creating a crisp line. So instead I drew a line with a pencil and ruler. Then I used my artist brush to create a straight line with the paint.)


Step 1

Spray the 4 inch circles with the modern white matte spray paint. I did about 3-4 coats. Make sure spray from about a foot away and spraying light even coats will keep the paint from sagging or pooling up. Let it dry between each spray.

Step 2

For the pool balls with stripes, I measured a 2.25inch area and drew a line with a ruler and a pencil. I tried to center it as well as I could, just make sure there is room for the smaller circle to fit inside. On my first attempt I used a taped line, but the paint bled through and I couldn't get the line very crisp. I ended up just using the pencil lines and my paint brush to free hand the lines.


Step 3

I printed out a photo of a what a real set of pool balls would look like. This helped me to match the paint colors and see how many I need solid and how many striped.


I painted each circle according to the stripe and color chart. I did around two coats on each to make sure the color covered up the wood. I did paint the sides as well.

Step 4

Lay out the numbers and spray them with the black paint.


Step 5

Hot glue the numbers onto the ivory circle tag. You will need 1-15.


Step 6

Once the numbers have dried and are securely on the smaller circle, hot glue the entire thing to the middle of the coordinating painted circle.


Step 7

I decided to distress each one a little bit. This added a little more dimension to them.


Pool Rack Supplies


- White spray paint

- Black spray paint

- Sanding block

- Wood glue for hot glue gun

- 1/5 inch Screws

- Sawtooth hanger

- Hammer / Measuring tape / Miter saw / Jigsaw


Step 1

Measuring and cut 3 (26 inch) long sides for the triangle. The angles on both ends of the pieces will be 30 degrees. Spray paint each of them black. Once they dry completely I used a sanding block to rough them up and distress them a bit.

Step 2

Cut the plywood into a 24 by 24 by 24inch triangle, or as large as you can get it from the plywood square. It's ok if it doesn't reach the far edges of the 1 x 2. This gets painted white.

Step 3

Once all the painted wood has dried, screw the plywood triangle onto the backs of the 1x2's.


Step 4

Position the cue balls in their designated spots. Make sure to start with a solid at the top and go with a solid / stripe pattern around the edge. Also make sure the 8 ball goes in its correct spot. Then use the hot glue gun to secure them in their spots.


Step 5

Last step is adding the sawtooth hanger onto the back.

And there you have it! A fun DIY art piece you can proudly display anywhere you have a pool table!


751 views0 comments
bottom of page